
Overview #
This section provides an overview of how warehousing works in Sentry.
Sentry’s warehousing system allows you to keep track of all stock, incoming and outgoing, within your company’s warehouse.
Warehousing in Sentry involves the following features:
- Purchase orders;
- Deliveries;
- Stocktakes; and
- Stock monitoring.
In general, when using warehousing functionality in Sentry it is important to understand the triggers that Sentry uses to increment and decrement stock throughout the system.
Creating a warehouse #
The first step when it comes to keeping track of stock is to set up a warehouse.
Go to this URL: https://app.sentryvend.com/warehouses.
Alternatively, you can look for the ‘Warehouses’ tab in the drop-down menu under ‘Warehouse’ in the Sentry navigation bar.
Click the ‘Add warehouse’ button in the top right-hand corner, and the warehouse creation view will appear.
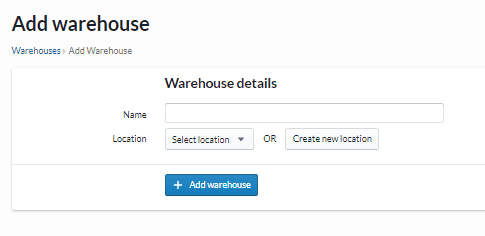
Give your warehouse a name and then press the ‘Create new location’ button. The Add location dialogue will appear.

Give your new location a name.
You may also optionally provide access hours, directions, and any tags that might be relevant.
Finally, add an address and input coordinates.
You can then click ‘Add location’ and then ‘Add warehouse’.
Note: It is very important to have your warehouse set up first, as every route, delivery, stocktake, purchase order, etc., will need to be associated with a warehouse. All stock monitoring will be based around its movement to and from the warehouse.
The next step is to assign all routes a warehouse. Go to this URL: https://app.sentryvend.com/routes
Alternatively, you can look for the ‘All routes’ tab in the drop-down menu under ‘Routes’ in the Sentry navigation bar.
All routes will have the option to assign a ‘Pick warehouse’. Make sure that each route is assigned to the warehouse where they will be picking stock from.

This is important because Sentry’s stock forecasting capabilities are based on the pick warehouse of each route. Stock is also decremented from a warehouse based on a route’s pick warehouse.
Stock #
The stock view on Sentry allows you to see an overview of all the current levels of stock you have on hand.
To access it, go to this URL: https://app.sentryvend.com/stock.
Alternatively, you can look for the ‘Stock’ tab in the drop-down menu under ‘Warehouse’ in the Sentry navigation bar.

You can see on the right how many cases and units of each product Sentry has calculated you have on hand in the warehouse.
You can see a more detailed stock view by warehouse in the drop down menu under ‘Warehouse’, hovering over the warehouse you wish to view, and then selecting ‘Stock’.

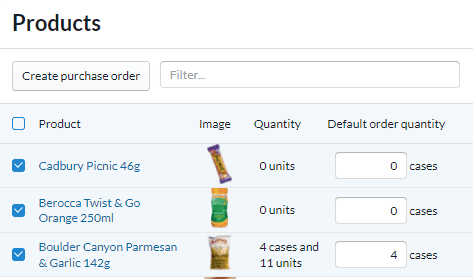
In this view you can not only see the quantity of stock, but also the reserved quantity, default order quantity, case size, and pick order.
- The reserved quantity is the stock that is currently added to picklists but has not been restocked in a market or machine yet.
- The default order quantity is the default amount of stock that will be added to purchase orders when that product is added (this can always be adjusted at the time of adding a purchase order).
- Case size is the number of products that are included in a single case of that product. This is added when the product entry is created in Sentry as a global product library value, but can be overridden by you.
- Pick order refers to the product’s location within the warehouse. This makes picking and packing orders easier, as the person packing is able to check items off in order as they move around the warehouse.
Picking stock #
When a product is added to a picklist, Sentry tallies it as ‘reserved stock’ but does not yet subtract it from total stock levels.
Sentry will automatically adjust stock levels as they are picked. When using warehousing functionality, stock is decremented from a warehouse when the checkbox on a picklist is checked. If the checkbox on a picklist is not checked, warehouse will not decrement, resulting in errors.
If you edit pick item, it will adjust warehouse stock levels for that product, whether increasing or decreasing.
Note: Deleting a service run or a service of a machine or micro market will result in re-incrementing warehouse stock levels of the same amount that was picked and decremented.
Note: If you create a service but then never complete it, this will have no effect on stock levels in a warehouse. It is best to avoid this, as stock added to a run that has not been picked will still be logged as reserved stock.
When a machine or micro market is being restocked, confirming stock levels in Sentry does not affect stock levels recorded in the warehouse.
Suppliers #
You can add suppliers to Sentry so that you know where certain stock has come from. This helps when making purchase orders (explained below).
To create a supplier, go to this URL: https://app.sentryvend.com/suppliers.
Alternatively, you can look for the ‘Suppliers’ tab in the drop-down menu under ‘Warehouse’ in the Sentry navigation bar.
Select ‘Add supplier’ in the top right-hand corner and the supplier creation view will appear.
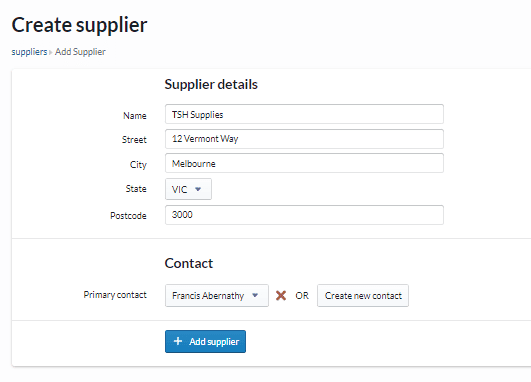
Add the name of the supplier, their address, and the contact details of the main point of contact of that supplier. Then click ‘Add supplier’ to finish.
There will now be a ‘Products’ field for the supplier. Here, you will need to add all the products that you typically receive from that supplier. Click ‘Add/remove’ to bring up the products dialogue.
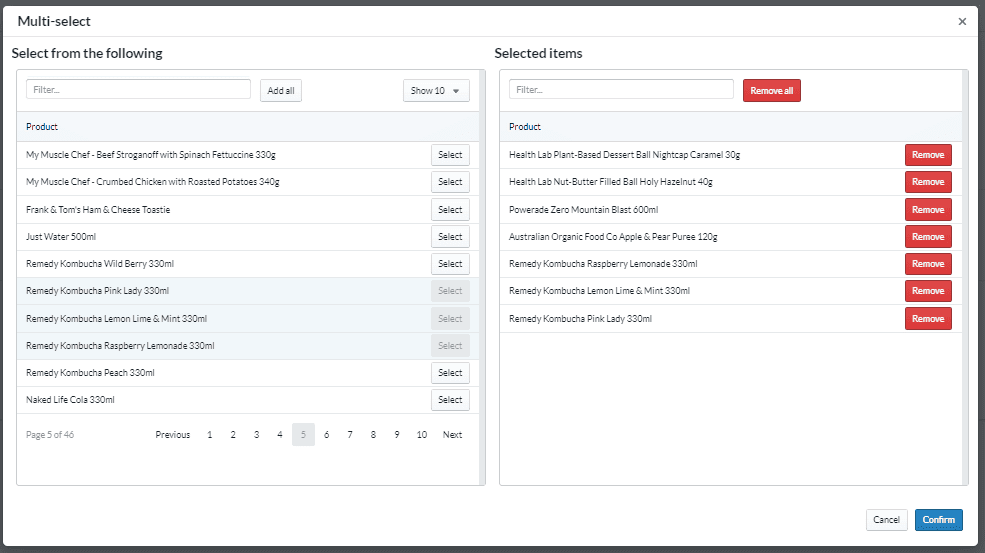
Search for products in the left panel and click ‘Select’ to add them to the list of supplier products on the right panel. Then click ‘Confirm’ to finish.
Note: If you create a supplier and do not add any products, then you will be able to add any product in your library to purchase orders made with them.
Purchase orders #
Purchase orders provide a record of incoming stock and help Sentry know when stock has been ordered to the warehouse.
To see your purchase orders, go to this URL: https://app.sentryvend.com/purchase-orders.
Alternatively, you can look for the ‘Purchase orders’ tab in the drop-down menu under ‘Warehouse’ in the Sentry navigation bar.
Each time you make a new order of stock to your warehouse, you can create a purchase order so that Sentry’s stock levels are up to date.
To start, click ‘Create purchase order’ in the top right corner of the page, and the ‘Add purchase order’ page will open.

Select a supplier and the destination warehouse for the stock. Then click ‘Create purchase order’.
Now add the products that you have ordered from the supplier. Click ‘Add product’ in the top right hand corner and the products dialogue will open.

Select the item from the drop down menu by searching.
The destination quantity is how many units of this product you currently have on hand in the warehouse.
The quantity is how many you have ordered from the supplier.
Click ‘Add to order’ to add the product to the purchase order. Repeat this process for each product that has been ordered.
Note: You can only add products to a purchase order that have already been added to the supplier that the purchase order comes from.
Deliveries #
Deliveries show what stock has arrived at the warehouse. Once a product is added to a delivery, the stock levels recorded in Sentry will go up accordingly.
The best practice for creating deliveries is to make them from purchase orders.
To do this, select all the products that arrived in the purchase order by checking the box to the left of the product name.
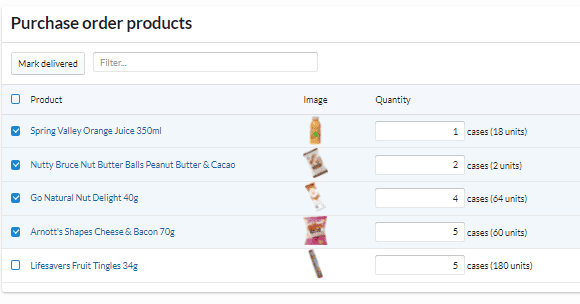
Then click ‘Mark delivered’ to make a delivery. This will open the ‘Create new delivery’ window.
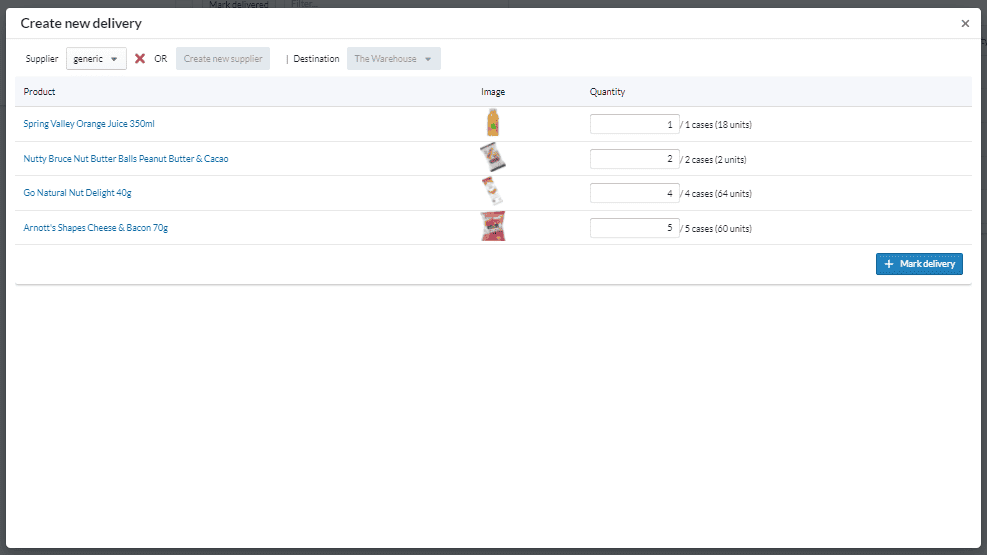
Here you can adjust any numbers. If, for example, the supplier did not deliver the right amount of stock, you can adjust it here.
Then click ‘Mark delivery’ and a new delivery will be made. You will be taken to a view of that delivery automatically. Sentry will also automatically update stock levels in the warehouse.
Note: Any stock that was not marked as delivered will remain in the purchase order.
Stocktakes #
A stocktake is where you conduct a manual count of all stock in your warehouse in order to correct erroneous stock levels in Sentry.
To enter your stocktake data into Sentry go to this URL: https://app.sentryvend.com/stocktakes.
Alternatively, you can look for the ‘Stocktakes’ tab in the drop-down menu under ‘Warehouse’ in the Sentry navigation bar.
Click the ‘Add stocktake button’ in the top right corner of the page and you will be taken to a new stocktake page.

Log the date, warehouse, and the person performing the stocktake, then click ‘Add stocktake’.
You will then be taken to the new stocktake page.
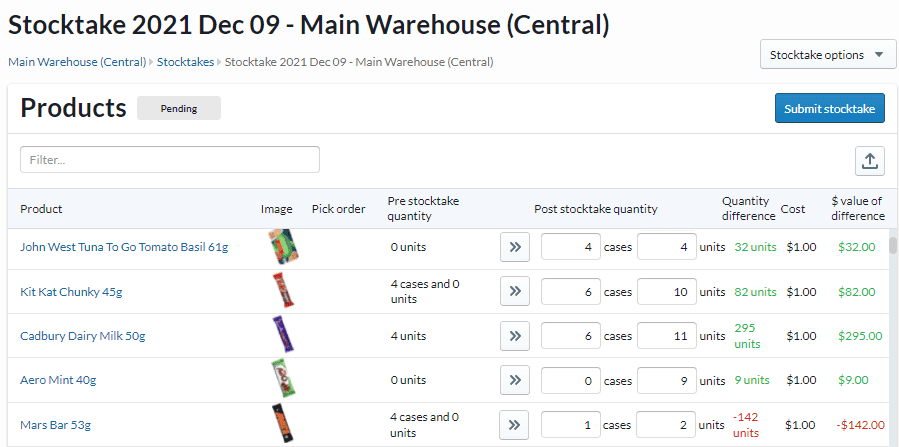
All of the warehouse’s products will be listed, as well as pick order, the stock levels Sentry had recorded pre-stocktake, and fields for the post-stocktake count.
You must go through and enter the amount counted for each product.
For each entry, Sentry will calculate the difference between stock counts and the monetary value of the difference.
At the end of the stocktake, Sentry will calculate the total difference in stock levels and monetary value before and after the stocktake.
Stock monitoring #
You can see an overview of stock and how quickly it is expected to last using the Stock monitoring feature in Sentry.
Go to the drop-down menu under ‘Warehouse’ in the Sentry navigation bar and hover over your selected warehouse, and then click ‘Stock monitoring’.
You will then see a view of all the stock in that warehouse.

Product names will be listed on the left, followed by:
- Quantity, as in the current stock levels you have on hand;
- The default order quantity, which is the default order that is pre-filled when making purchase orders;
- The default order lifespan, wherein Sentry predicts how long a default order of stock would last based on average daily vends;
- Daily vends, which is the average number of times a product is vended per day, based on the average over the last 28 days;
- Days to empty, which is how long Sentry predicts a product’s stock level will last based on daily vends;
- Quantity in 7 days, 2 weeks, and 4 weeks, which is how much stock Sentry predicts you will have on hand on those days, again based on daily vends; and
- Delivery status, which shows if a product has been delivered if it was added to a purchase order.
Using Sentry’s predictions, you are able to see what products are moving quickly and will need to be ordered soon.
You are able to make purchase orders directly from the stock monitoring page. Just check the box to the left of the items you want to order and then click the ‘Create purchase order’ button at the top of the list.
Negative stock levels #
Negative stock levels are controlled in Settings.
To see them, click on your Username in the top right corner, click Settings, and then Warehousing.
It is best practice to have the ‘Picked stock can exceed warehouse stock levels’ on.
This allows you to add products to picklists even if the stock levels in Sentry indicate there is not enough.

This means that if Sentry’s stock levels or wrong, you can still complete picklists and service runs.
You can also turn on the ‘Allow negative stock values in warehouses’ setting.
When this is on, stock levels may go negative in a warehouse, meaning more has been picked than Sentry thinks there is available.
Again this may be useful if the stock values are wrong in Sentry for whatever reason.

Note: In order for ‘Allow negative stock values in warehouses’ setting to work, the ‘Picked stock can exceed warehouse stock levels’ must also be on.
Other warehousing impacts #
The following other general effects on warehousing may be useful to know when using warehousing in Sentry:
Queued products
- When a product change is queued such that a stockist will remove the existing product when attending to a machine or market, this will result in re-incrementing stock in the pick warehouse for the service run.
Product swaps
- When two products are swapped (i.e. they are queued to be changed to one another) there will be no warehousing impact, because no stock is returned to a warehouse.